Showing posts with label droplet. Show all posts

Tuesday, October 13, 2009

Thank you Amateur Photographer!

I hope you will excuse a moment of pure self-indulgence however I'm over the moon today!

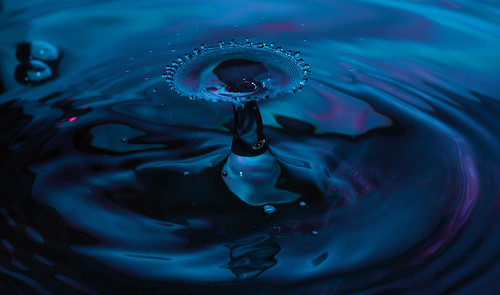
Amateur Photographer published a whole 2 pages of my pictures in their latest edition (17th Oct). The first time I've ever seen my stuff in print and it's really a milestone for me. This splash is dedicated to them :) freshly created last night.

I'd like to thank them for publishing my pictures, it's really given me a boost, hopefully if there's a next time I'll have some even more amazing shots for them :)
 
This shot is for them :
 
Amateur Photographer Splash

However the real thanks have to go to everyone else that has helped me on my photographic journey so far

My Dad.. His enthusiasm for photography since I was small and his willingness to teach me everything he knows and help out wherever he can (you think your getting back that vivitar 285 flash you 'loaned' me? :) ) really kept me going.

My Mum.. for putting up with the photo-talk when I come round and loving all my pictures.

My Family.. for putting up with kitchen's covered in food dye, no milk in the morning for cereal because I used it all up making splash pics and generally for being great.

And for everyone on flickr for such great comments, faving my pics and occasionally pushing them up into that hallowed ground of 'Explore' :)

Thanks also to all the other 'serious' water drop photographers on flickr who share their methods and wisdom (if I forgot you I'm sorry) : SteveP Corrie Jens VisualAssault Keith2784 Jason Mark Sporys Aylesbury_Mark you all do such great work!

Thank you all.
Chris

Wednesday, June 17, 2009

Focus & Colouring

Right so your all ready to go.. you point your camera at the water and.. what DO you focus on?

The drops come too quickly to see clearly and one bit of water looks pretty much like another.

What I do is set the drops going and then lie a bread knife across where the drops hit the water. (Why a bread knife?.. it has a nice serrated edge thats easy to focus on). If your doing single drops then have the edge that your focusing on JUST in front of where the drops are landing. If you are doing impact splashes that you want to go out then move it so that you are focusing between 0.5cm and 1cm in front of where the drops land.

SET TO MANUAL FOCUS!! (I always focus up, then hit the button and it tries to autofocus and I have to go back to focusing again! :)

This is where having live-view and an option to magnify the screen comes in REALLY handy!


Other stuff I have used.. Piece of string across where I want to focus, pipe cleaner (really fuzzy works very well!) you can use pretty much anything.

Now you have to see what you want to do to make the stuff stand out.. I'll go into this in more detail at a later date but here's some ideas.

Plain water does not look like much, no contrast between it and the background and it does not reflect light it refracts whatever is behind it.

Backgrounds
Put a background behind the drop, colourful, stripy pictures, a nice flower, anything can be a background, all give different effects.

Squiggly

Flash Gel's
Put some clear gel plastic infront of your flash and it will turn everything that colour. I've used a red plastic beaker before with some nice effects. 2 flashes with different colours can give some amazing looks. (I only have one flash at the moment, have experimented with covering half with different colours.. kinda worked)

Strobist Style

Dyes
These can work really well.. Different colours in the bowl of water and in the droplets can make some great effects. Can be messy!!

Also once the two colours start to mix you can either end up with non-photogenic sludge or something quite unusual.. never sure what you will get.

Halo (Explore #18!!)

Experiment.. try.. see what different colours you can get..

Chris

Monday, June 15, 2009

Light, Motion and Depth of Field

Here's how I understand this... (I'm not an expert in this....)

Higher (smaller) aperature = wider depth of field
Higher aperature = more light needed to take a picture
More light (bigger flash) = slower (longer) flash = more motion in your drops
AND... Distance to target (size of final image)

So you have to trade off Aperature (DOF) vs Light vs Distance to target to come up with a reasonable middle area that gives you acceptable depth of field that's well lit.

If you are photographing simple droplet's like :

Mountains of Jupiter

Then it's moderately simple.. the DOF is not very wide (depending on the angle you are photographing from) so you can use a moderate aperature. The DOF needed on this picture is probabily no more than 4-6mm.

However if you are trying to take a picture like :

Milk Sunshade

You can see that the required area to be in focus is MUCH wider. If you look in large then you can see that the drops to the side/back are actually out of focus. But as the ones at the front are in focus then it does not look too bad.

How do you do it?

http://eosdoc.com/jlcalc/

This is a great calculator for figuring out your depth of field using almost any equipment. Put in how far you are from the target, focal length etc and it will tell you how wide your DOF is.. I try to aim for a minimum of 12mm

However with only 1 flash (Vivitar 285) set to minimum power with water I get really dark pictures without dropping down ISO to around 400 and aperature to F13/F14. Milk is a lot easier as it is opaque and reflects the light so even at F16, ISO100 I can get nice brightly lit pictures.


Tips :
Have a look at the calculator and see what DOF you can get at what distances etc
Take some test shots and see how they come out and work out what you want to sacrifice.

My standard settings (for milk drops)

Canon 100mm Macro :
Distance 34cm (ish) works out to be around 1:3 magnification
F16, ISO 100

55mm M42 lens + 12mm extension tube :
Distance 29cm (ish) works out to be around 1:4.2 magnification
F16, ISO 100

For water drops probabily go to F14 & ISO 200 at the same distances.

You *can* increase the power of the flash you are using.. so you can use higher aperature.. HOWEVER this will mean the flash will be slower and so you risk introducing movement into the final shot.

Try. Experiment, see what works, fiddle around a bit.. and take lots of pics!